Pencils don't get the respect they deserve. What with the popularity of digital image processing, vectorized line work, and - what's that stuff called? - oh yeah, paint. Sadly, it seems the pencil has been forgotten at the bottom of everyone's Art Bin along with the Pop Tart crumbs and that rock-hard tube of Liquitex Medium Magenta.
But I ask you, who doesn't love the feel of a bright yellow Ticonderoga #2 wood pencil twirling in your fingers or tapping on the edge of your desk? Nobody, that's who.
Read on...
I say the wood pencil deserves to return to its iconic stature, with the makin'-it-happen end sharpened to a long, acicular point, and the pretend-it-didn't-happen end gnawed into an unrecognizable wad of crushed metal and moist rubber. Stick it behind your ear. Chew the paint off it. Hold it flat in your hand, thrust your arm upward, slap your wrist with the other hand, and watch your beloved writing implement rocket skyward until the point embeds itself in your office ceiling. Despite written claims to the contrary, Heaven is a place stocked with an endless supply of sharp wood pencils and thousands of square miles of acoustic ceiling tile.
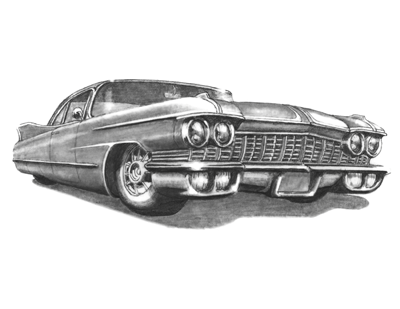
The pencil is a nearly perfect writing instrument. It's also a darn good drawing tool, as any bored art-kid stuck in High School history class will tell you. It can track a thin line that's so faint, you'll swear one of your arm-hairs fell onto the page. With a firm overhand grip, that same pencil can lay down a heavy pool of slick, black powder that, despite your best efforts, will end up partially smudged on your cheek. And with a skilled hand, it will create smooth, luxurious washes of silvery grey in any shade imaginable.
I've always been comfortable drawing with pencils. I've loved them all my life. Hell, I'm 46 years old and I still have a visible piece of pencil lead imbedded under the skin of my right palm from a John Bonham style drumming mishap in the third grade.
Today I use a Ticonderoga No.2 wood pencil for nearly all my pencil-roughs, layouts, contour drawings, and sketches.
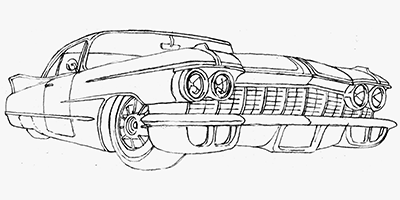

They can be sharpened in any standard pencil sharpener, though I've been told that the preferred method is using a sheet of fine-abrasive sandpaper. They're available in several hardnesses, though typically a 6B will do most everything that I need for shaded sketching.
In pencil parlance, the hardness of the lead is graded by varying levels of "H" for "hard" and "B" for "black" (*). HB stands for "Hard Black" (**) and is equivalent to the classic No. 2 pencil. Softer - and therefore darker rendering - pencils are labeled with increasing values of "B." A 6B lead is much softer than an HB, and 9B is softer still. I find that 6B is amazingly versatile for shaded renderings, able to hold a decent point while still laying down a pretty funky bass-note when asked. I suppose having a super soft 9B on hand would be helpful for deep black areas, but I haven't yet found much need for one yet. Harder pencils can range up to 6H, even harder. A 6H pencil makes a very thin, very light line, and is more comfortable in the hands of a draftsman than a sketch artist. It also doubles as an Exact-o knife.
Now, you'll notice that the art pencils don't have erasers attached to them. That's because artist's are nervous critters by nature, and we'd chew them off before we finished our first layout. So, we buy separate erasers, either of the soft block or kneaded variety. Be warned: these are not interchangeable! The block style, usually made from firm chunks of vinyl, erases using an abrasive action. It literally grinds out the graphite particles from the tooth of your paper. It's useful for removing large areas of goof-ups on bond papers, sketch pads, and Bristol board because these papers absorb (sort of) the graphite dust and need a rather aggressive approach to clean-up. Kind of like my 14-year-old stepson.
Kneaded erasers are more like Silly Putty; they are sticky, and they work by lifting graphite right off the paper. You don't usually rub a kneaded eraser across your work, you dab it right onto the area you want removed. Because they're kind of gooey, you can even mold kneaded erasers into pointed shapes to pick off tiny spots without disturbing the surrounding work.
I also use a mechanical pencil. Specifically, I use a Koh-I-Noor 0.7mm drafting pencil loaded with F lead. F is approximately halfway along the pencil hardness scale between HB and H, and I suppose it would be similar to the No. 3 lead in a classic wood pencil, though I can't prove this. I don't know what the F stands for, but let's call it "Fine." The F hardness in a 0.7 mm pencil is very useful for fine detail work, thin contour lines, or anytime I need to draw a hard edge along a metal, cork-back ruler.
Mechanical pencils like the Koh-I-Noor are also available in an absurdly thin 0.3mm variety, and I own one. I just never use it. I do sometimes use the uber-fat 0.9mm version for heavier line work. That bad boy gets H ("Heavy," slightly harder then HB) lead.
One other snazzy gizmo I use often is the eraser shield. It's basically a stainless-steel stencil that masks the work you want to keep while exposing tiny lines, dots, or arcs that you want to attack with your eraser.
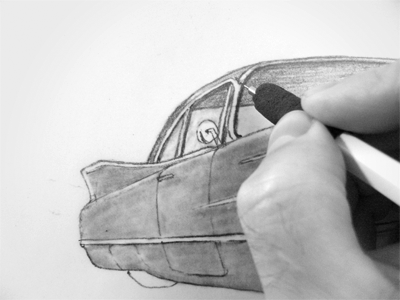
Oddly, the majority of the real estate in my graphite drawings is produced using a blending stick, not a pencil. These tightly rolled sticks of paper push the graphite dust around the surface of your page to create those smooth gradients of gray.
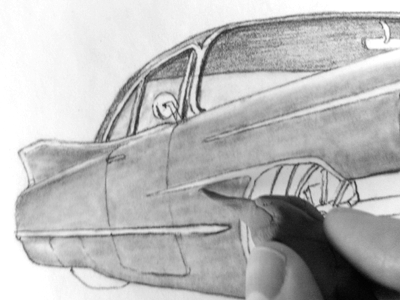
After the base layer of gray is down, I can start adding shade and shadow. Again, I lay down a heapin' helpin' of graphite in the darkest areas, then feather it out into the lighter areas using the blending stick. Here, the quarter panel area behind the headlight has been blended out while I'm starting to shade the rocker panel.
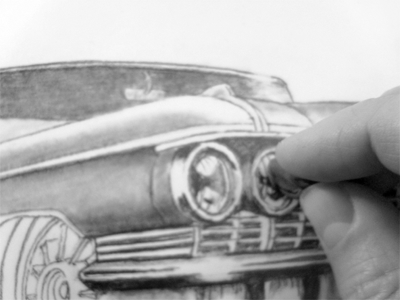
The key is to start light, then build to dark. It's tempting to fill in all the heavy shadow areas early so that the image will pop. But you must resist. The danger is that you'll smear all that graphite dust over your drawing as you work on the finer details. Details first, shadows last. Also, never let your bare skin touch the artwork; always rest your hand on a clean sheet of bond paper. Your skin has oils that will smudge and yellow your artwork.
Finally, when I've gather the strength to stop obsessing over impossibly small details and can finally call the drawing finished, I spray the entire sheet with an acrylic fixativ. This locks the loose graphite dust down to the surface to prevent smearing. The good stuff won't yellow or get all crinkly. Some artists use hairspray. Some artists also use drugs. I don't use either.
Now back to the drawing board.
(*) Linguists in the audience will recognize that "black" is not the opposite of "hard." This is because language is a left-brain activity and art is right-brained. It's hard to get the two sides to agree on anything.
(**) I've also heard the "HB" stands for "Heavy Black." This doesn't make sense to me because HB is the hardest black lead you can get.


